Pages

Saturday, 28 May 2011

A Flower For All Seasons - Poinsettia

Here's the final installment in this series using the images in the stamp set "A Flower for All Seasons".  This lovely poinsettia has been coloured a lovely rich red, but they are also grown in cream. Did you know that?  I used to have a wonderful red Poinsettia under my kitchen window, when I lived in Perth, which flowered all year round.  We could grow such different plants there because of the lovely warm climate.
I have used only a corner of the embossing folder "Manhatten Flower" on the bottom of this card front.  This keeps it simple and has quite a striking effect.
I made my brad using a piece of card stock punched with a 1/4" circle punch and added crystal effects to it.  Quite effective isn't it? There's an option you may not have thought of if you don't have a matching brad.
Stampin' Supplies
Card stock: Not Quite Navy, Real Red
Inks: Real Red, Garden Green, Soft Suede, Crumb Cake, Not Quite Navy and Bashful Blue
Other: Manhatten Flower embossing folder, Big Shot, Water colour paper, Aqua painter, Whisper White 1/4" grosgrain ribbon
Thanks for stopping by

Thursday, 26 May 2011

A Flower for All Seasons - Sunflower

Well I did say I would post a card I had made with all four lovely images in "A Flower for All Seasons" stamp set.  So here's card number three. These sunflowers remind me of the year we planted heaps of sunflower seeds at the back of our property and were rewarded with a wonderful patch of really tall sturdy sunflowers.  They really are a very dramatic flower in a group planting.  Someone planted a "maize" with sunflowers in Upper Hutt one year.  What a wonderful idea.
I love making paper buttons using my Sizzlits Buttons #5 die.  Check out my earlier post on how I did this.
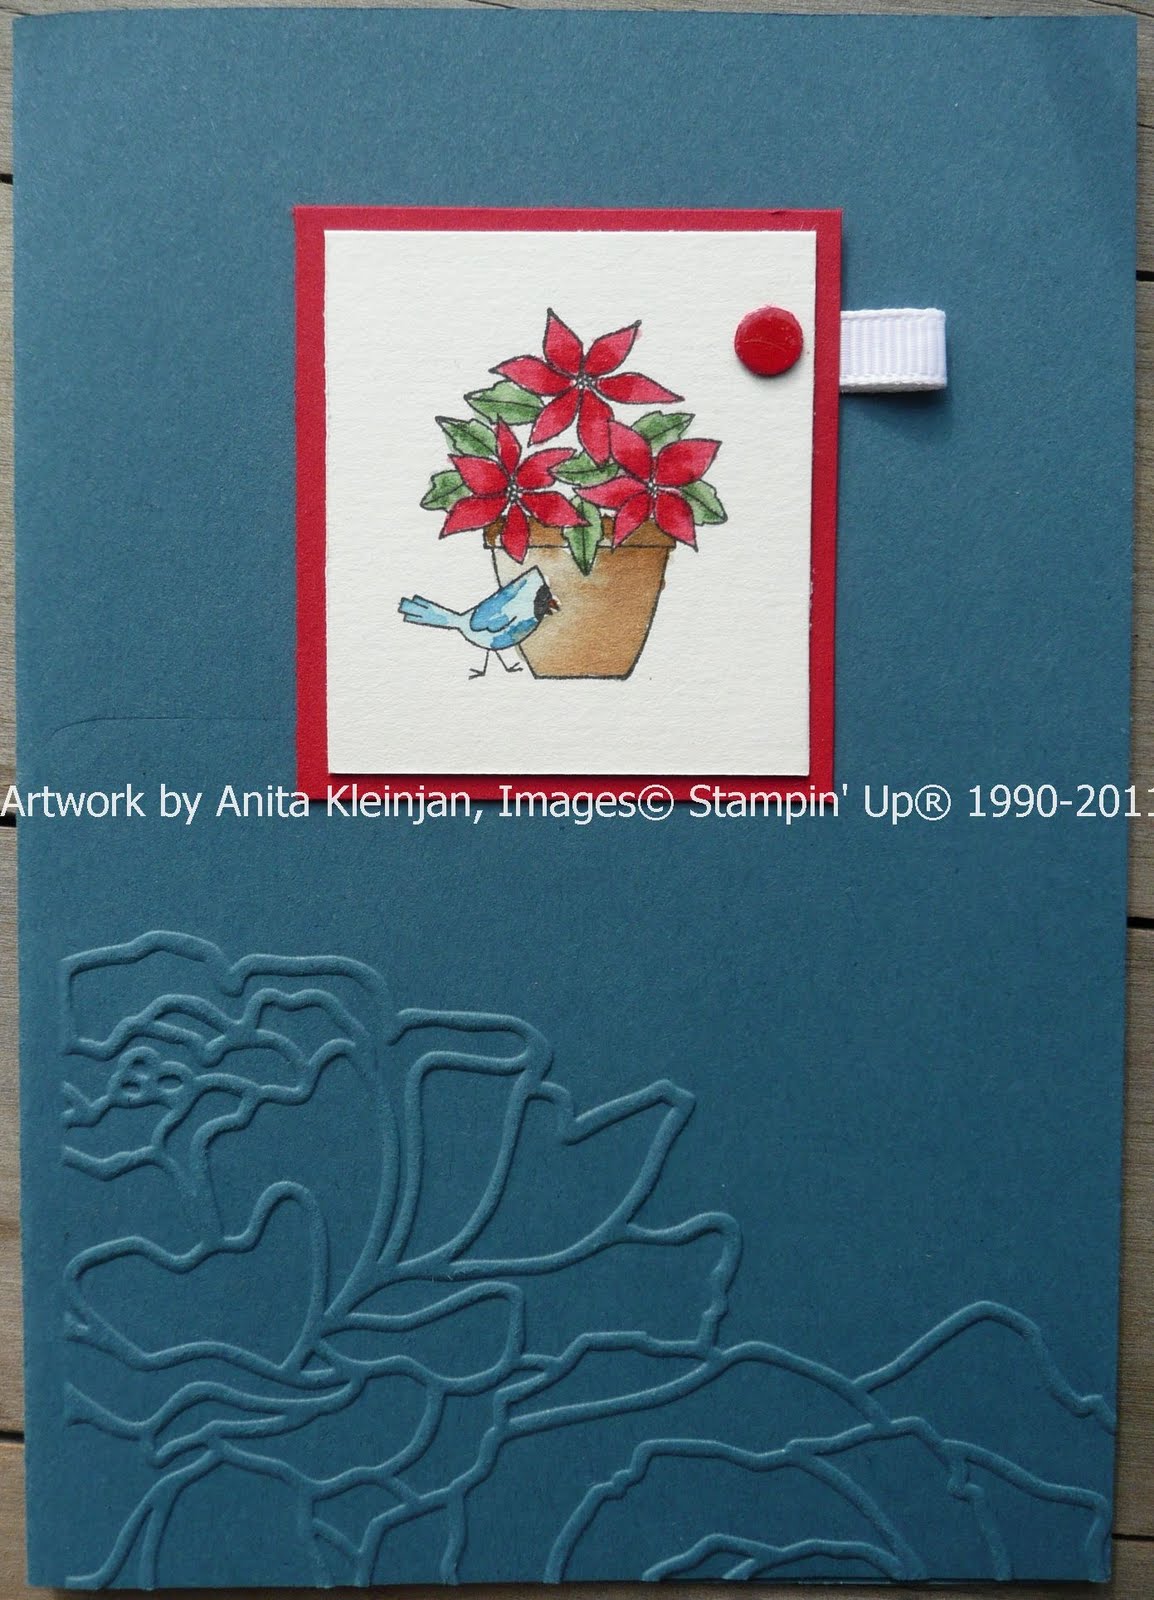
I love the wee detail of the ladybird climbing up the side of the pot. Terracotta pots develop there own character with age.  Cajun Craze is the replacement colour to Really Rust which I used to colour this pot.
I love small cards, they are so handy to have, wee notes that say so much.  I have left these cards with no greeting on the front, I can always add one later or use them for any occasion.
Stampin' Supplies
Card Stock: Garden Green, Soft Suede, Very Vanilla
DSP: Woodland Walk
Inks: Daffodil Delight, Soft Suede, Cajun Craze, Real Red & Garden Green
Other: Scallop Edge punch, Buttons #5 die, Big Shot, Crystal Effects, Linen Thread
Thanks for stopping by

Tuesday, 24 May 2011

A Flower For All Seasons - Tulip

Here's the next card that I made with the stamp set "A Flower for All Seasons".  This one is the tulip image, which of course works so well with the "Framed Tulips" embossing folder that is available in the current Autumn-Winter Mini Catalogue. A little detailing using the Matt Pack and Paper Piercer, gives a wonderful faux stitch detail.
It just begged a bright cheerful colour, and here I used Daffodil Delight card stock and also sponged the embossed folder with Daffodil Delight ink to match. Using this colour was inspired by the warm sunny days we have been having over the past week. I even sat outside in short sleeves enjoying a coffee in the sun yesterday.
I have water coloured these images using an aqua painter and ink pads.  I have used the 1 3/4" circle punch for the image and it is mounted on a 2" circle cut out of Bashful Blue card stock using my Big Shot and the Circles #2 die.  Now there's a great combination of circle sizes for you to try out. 
Thanks for stopping by

Tuesday, 17 May 2011

A Flower For All Seasons - Daisy

Isn't it lovely when a customer let's you use a stamp set that you haven't got.  Thanks Annemiek. Here's a card I have water coloured using one of the images in this stamp set.
 I used my markers direct to the water colour paper for the frog, but you can see the varying colour change on the pot when using my ink pad with aqua painter and marker.
I will be posting more of these images as I have made a different card for each image in this stamp set.  A Flower for all Seasons is a fun wee set that has 4 stamps and is so reasonably priced at $29.95 + p&h. If you would like to order this stamp set then email me now.

Stampin' Supplies:
Stamp set:- A Flower for All Seasons
Card stock:- Real Red, Whisper White, DSP Celebrations, Water colour paper
Ink:- Daffofil Delight, More Mustard, Old Olive marker, Real Red, Cajun Craze marker
Other:- Large White brad from 5/16" Neutrals Assortment

Thanks for stopping by

Sunday, 15 May 2011

Butterfly from Nature Walk

Blogger has had a few issues, and my Thursday post disappeared, so here it is today.  My mother in law loves nature so here's the Mother's Day card I made her.  
I love these colours.  They are so Autumny.  I brayered a piece of Natural Ivory cardstock cut out with the Top Note die using my Big Shot. The faux stitching is done with Pumpkin Pie marker. I then built my scene using the stamps from the Nature Walk stamp set, using different inks, all in autumn tones.  The button is made using the Sizzlits Buttons #5 die.  I cut 4 layers and glued then together.  I threaded some linen thread through it and attached it using crystal effects.  It makes a great glue.
I then water coloured the butterfly on watercolour paper and cut it out.  I then inked the whole image with versa mark ink and clear embossed it.  It has given it a lovely shiny finish.

Stampin' Supplies:
Stamp set:-  Nature Walk
Card stock:- Pumpkin Pie, Naturals Ivory
Inks:- Early Espresso, More Mustard, Chocolate Chip, Crumb Cake, Staz on, Versa Mark
Other:- Top Note Die, Big Shot, Sizzlits #5 die, Water colour paper, Clear embossing powder, Heat tool, retired chocolate chip ribbon


Saturday, 14 May 2011

Every Moment - Birthday Gift Voucher

I love this stamp set, so when asked to make a Birthday voucher for a special lady, I knew that this would delight her, and I wasn't wrong.
I have used the masking technique to layer the daisies.
I have made a tag out of the lovely wee phrase that is in this stamp set.
I even stamped the envelope to match.
Stampin' Supplies:
Stamp Set: Every Moment
Card Stock: Soft Suede, Naturals Ivory
Ink: Daffodil Delight, More Mustard, Old Olive
Other: Old Olive grosgrain ribbon, Antique Brass jumbo eyelets, button from Brights collection, Very Vanilla taffeta ribbon, hemp twine, spritzer, pearls.
 
Thanks for stopping by

Tuesday, 10 May 2011

Bees - from Nature Walk

Good morning.  The sun looks like it wants to warm us up and cheer our day today.  It is welcome. Here's a card I made a while ago, and as I love water colouring, not a surprise I was trying out my new "Nature Walk" stamp set using this technique. The very first technique that gave me that WOW factor at a workshop was the two circles (1 1/4" and 1 3/8") cut out with SU punches layered on top of each other.  Sometimes it's nice to go back and reuse the same technique.  I tend to get complicated sometimes and it's not necessary. Two of my downline promoted in March, and I sent this card to them. Congratulations Jo & Brenda. 
I have used Chocolate Chip card stock and double inked on it using the Sanded stamp with White Pigment ink and Early Espresso ink.  The bees have been black embossed on the card stock and also water coloured in the circles. They have been cut out using the 1 1/4" circle punch and layered onto a circle of More Mustard cut out using the 1 3/8" circle punch. They are laid on a piece of Pumpkin Pie card stock that has had the edges ruffed up. 
Hope this gives you some inspiration.  Enjoy your day.
If you would like to learn some of these techniques then book a workshop, have some crafting friends over and I would be happy to show you how this technique is very easily achieved. Hawke's Bay only.
Thanks for stopping by

Sunday, 8 May 2011

A Pretty Petal Pocket Basket

I wanted to make a craft item with my sister when I went to visit her.  She likes purple and I had purchased this pattern from "Papertrey Ink" some time ago and have only made a basket for myself, which is not quite embellished to completion yet.  We really enjoyed making this and my sister learnt a few new techniques with sponging.  She has also fallen in love with this stamp set, having seen yet another use for it. It seems to love being used in about any colour.
We put it in one of the bushes to photograph it.  I have used white card stock for the flowers, stamped the outline image with Perfect Plum ink and sponged it with matching ink and also Rich Razzleberry ink to give the flower colour. 
The flowers were made using punches and cut out flowers layered on top of each other.  We also made the leaves using the Little Leaves sizzlits die.  Hope this cheers your day. 
Thanks for stopping by

Saturday, 7 May 2011

Inspired by Nature

It's definitely time to blog, but my flat screen has died. Thanks for your patience. Until I sort a new one I'm working with an old one from the ark, it's so in my face, that I'm finding it a little difficult to use. I have been card making though and have a few cards to share with you. Here's a card I made for a dear friend in Christchurch. It's the first time I have used the whole image of my stamp set "Inspired by Nature".  I love how you can stamp one image over the other.
I used Certainly Celery as my card colour base with a strip of Poppy Parade.  I stamped my grass and flower on Naturals Ivory card stock.  I coloured my image using markers to give the flowers a graded colour.  So very quick and simple.  I am really enjoying using my "Lot's of Tags" sizzlits.  One of the tags is used on this card. The butterflies are just such a good addition to a card like this.  The "Beautiful Wings" embosslits never disappoint, they emboss and cut out your butterfly for you, all in one quick easy step.
Thanks for stopping by

Tuesday, 26 April 2011

Inlaid Embossing

I hope you have all had a wonderful Easter break.  The weather was particularly lovely in Hawke's Bay but the rain that has arrived, looks to be settled in for a while.
So it's a great crafty sort of day, the gardening will have to wait. I have had a few extra young vistors for 2 weeks whose Mum needed to be away.  Here's a card I made with the daughter for her Mum's return.  We spied just the right words that were part of a stamp, in the retired stamp set "Sweet Little Sentiments".  Using a Stampin' Write Marker we inked just the words we wanted.  You can use this same technique when using an image stamp too.
The butterfly is flying the banner and the string also doubles as antennae.  Being able to have precut embosslit butterflies, made this project very simple to put together and is still beautiful in it's simplicity.  I will be putting a Mother's Day card project together for a 'new entrant' class, so I have been thinking how I can achieve a wonderful result and be able to keep the project 'new entrant' proof.  This has made me look at my supplies through 'young' eyes. We are spoilt with so many wonderful tools to make our craft life easy.
Stampin' Up! supplies: 
Embosslits die: Beautiful Wings
Card stock: Rose Red & Pretty in Pink
Sponging: Rich Razzleberry
Other: Basic Pearls
Thanks for stopping by


Thursday, 21 April 2011

Bunny Basket

Here's a basket decorated with a bunny to house some chocy treats.  I made a few that have made there way to Christchurch for my sons.  I got this basket pattern quite some time ago from Splitcoaststampers but am unable to find a link for it, sorry!  My bunny has been made using some punch art.  My sons will also have their sister visiting them to help eat the chocolates.  Now that's a treat!!

He even has a fluffy tail.  I got the idea for his tail from Paula Dobsons "Bunny Bum" card,  I really loved that idea. Thanks Paula.
Hope you all have a lovely Easter break and that you don't consume too many calories, but take time to remember the real meaning of Easter.
Thanks for stopping by

Thursday, 14 April 2011

Autumn Leaves

I love this time of year, the colours of the leaves changing, the last of the warm days. Winter is letting us know it's coming with those crisp starts in the morning.  I just don't get enough craft time to play with the ideas that flit through my head and my MOJO comes and goes.  This card was inspired by the idea that leaves need spritzing to give them the natural Autumn look.  They are not plain and uniform in colour.
I was also using my new "Lots of Tags" Sizzlits 4-pack die and using my "Stamp-a-ma-jig" to position my "Thank You" stamp nicely in the middle. 
All scenes are usually so much more memorable when a lovely coloured butterfly comes along, flits for a while to let us see it's beauty, and then moves on.  This a la carte stamp "All a Flutter"  has been stamped with Staz On ink onto Vellum card stock and coloured in with aqua painters and ink.  I was very happy with the finished effect. This is the first time I have tried this idea, I will have to do it more often.  The edges turned up naturally when they became damp, so this was a bonus in my favour.
All together this is the completed look.  Hope you have had a minute to enjoy the sun today,  if it was out for you, I did.
Thanks for stopping by

Thursday, 7 April 2011

A Scrap Page - finally

It's long overdue but there's nothing like meeting with a group of scrapbookers to inspire me to create an all SU scrap page.  I really enjoyed doing this and wondered why I don't get to do more scrapbooking. Scrapbooking is making it's way up my priority list.
I used Old Olive card stock as my base and added a 4 inch strip of Greenhouse Gala DSP. I have stamped the grass using Inspired by Nature in Old Olive ink. I have used my Top Note die as my journalling spots and sponged there edges with Old Olive ink.  
The flowers and leaves were inspired by the hanging baskets of rich purple petunias in the photo.
I have layered 2 cut out 5-petal punch flowers for each and run them through the crimper.  The centre is a black cut out flower from the Boho Blossoms punch.  The leaves are cut out using the Little Leaves die and I have sponged the edges with Old Olive ink. The photo is matted on Rich Razzleberry and then Sahara Sand card stock. I made another page on the evening and gave it to my hostess without the photo, so she can add her own.  She loved it.  Hope you are planning your craft projects to occupy you in the cooler months ahead. If you haven't tried scrapbooking, I can personally recommend it.
Thanks for stopping by

Monday, 4 April 2011

Nature Walk

There are so many lovely new products that tick the box for me in the Stampin' Up! Autumn-Winter Mini Catalogue, just released 1 April.  Check out the lovely products available by clicking on the picture to your left. When I received the wonderful stamp set "Nature Walk" as a door prize at Regional Training, I was delighted.  Here's the first card I made using the stamp set.
I used More Mustard as my card base and stamped the eggs and sponged the edges of the "Framed Tulips" embossed card with it too. I combined it with Cajun Craze, it's the replacement colour to the retired Really Rust. I always love working with that colour.  It's rich and deep colours, fit the stamp set and all Autumn themed scrap pages.
The bird had a little attention from some markers.  They are such wonderful tools to colour stamps in with and you get such a professional look.  A little "Always Artichoke" card stock stamped with the bird cage on it has given the card it's third dimension colour.  I hope you feel inspired to get crafting and try out this new stamp set too.
Place your order for the "Nature Walk" stamp set today, $62.95 wood-mount or $49.95 clear mount for a set of 7 stamps + p&h by emailing me today. 
Thanks for stopping by

Sunday, 3 April 2011

Inspired by Nature

"Inspired by Nature" has been one of the stamp sets I have always wanted since I first saw a Stampin' Up! catalogue over 2 years ago, and now I finally own it. I am not disappointed.  I had embossed a sheet of So Saffron with the "Elegant Lines" embossing folder a while ago, and it has just sat on my desk waiting to be made into a card.  Seeing a piece of cardstock with Very Vintage wheeled on it in Chocolate Chip ink when mounting my new stamp set got my Mojo flowing and this is what I came up with. Have you noticed the "Framed Tulips" piece of Cherry Cobbler card stock on the card.  You guessed, another wonderful new embossing folder available in the Stampin' Up! new Autumn-Winter mini catalogue.  
I thought I would put a matching button on this card. I cut the buttons using the "Buttons #5" die. Cut 3 matching buttons out and glue together in layers using a glue stick.  I threaded the buttons onto my paper piercer to line up the holes to give it a lovely clean match.  Tie with a little linen thread, and attach with a glue dot. Your button will be a perfect match on your project. 
Cherry Cobbler is such a great colour with So Saffron.  I still get such satisfaction seeing how Stampin' Up! inks and card stock match so beautifully.
I need to make a few of these to put into my stash.  I really enjoyed making this card.
To get your  "Framed Tulips" embossing  folder for $19.50NZD and "Buttons #5" die $12.25 + p&h, email me today to place your order.
Thanks for stopping by


Saturday, 2 April 2011

Create a Cupcake - so yummy

Who doesn't like a cupcake!  The icing always gets me, the cherry is so tempting. This is the card we made at our recent Stampin' Up! Regional Training using the new "Create a Cupcake" stampset and also it's corresponding punch, "Build a Cupcake Punch".
They look so yummy. For the icing the lovley In Colours, Peach Parfait, Blushing Bride and Pear Pizzaz were used along with Soft Suede.
I love how these colours come together, they are cheerful and summery.  Let's enjoy the last of our warmer sunny days while we have them, and don't forget to sit and enjoy a cupcake or two, while sitting in the sun.
If you would like to make some lovely cupcake cards then email me to place an order for this wonderful "Create a Cupcake" stampset $55.95 wood-mount or $36.95 clear-mount and it's corresponding punch "Build a Cupcake Extra-Large Punch" $41.50NZD + p&h.
Thanks for stopping by