Pages

Wednesday, 29 December 2010

Strawberries for Christmas

I hope everyone had a lovely Christmas and had some special treats.  Most importantly, that they got some quality time in with family and friends.  Summer time in New Zealand means strawberries, and we have had plenty of those this summer in the Bay.  I decided already last year that my idea of a Christmas card would be a bit 'Kiwi-ana-ish'.  I did not manage to post cards last Christmas, but I did manage to get a  number out this year.  Here's one of the Christmas cards I promised to share, it's my take on a Kiwi Christmas card.
And because they have been picked oohh! so early in the morning, they have a bit of dew on them, to make them that much yummier. I picked strawberries in my youth, and you had to start work early!!
I hope you enjoyed this theme. I love how our Stampin' Up! stamp sets can be used in so many different ways, with different themes. 

Stampin' Up! supplies:
Stamp set: Tart and Tangy & Many Merry Messages
Cardstock: Old Olive, Cherry Cobbler and Whisper White
Markers:  Chocolate Chip, Cherry Cobbler and Garden Green
Other: Crystal Effects and Dimensionals 

Thanks for stopping by 

Friday, 17 December 2010

Happiness Is....

A while ago I bought this lovely wee plaque and it sits on my craft desk.  It's such an appropriate sentiment for me, especially placed by my stamp sets etc.  I love it because it reminds me to keep perspective on what's important.  I wanted to share it because while I'm looking forward to Christmas, I am looking forward more to being together as a family. Relationships are what makes life important and meaningful.
Paul said 
"for I have learnt to be satisfied with what I have.  
I have learnt this secret, so that anywhere, at any time, I am content.." 
Phillipians 4:11b-12a

Thanks for stopping by

Wednesday, 15 December 2010

Butterfly on Fern

When I chose the "Growing Green" stamp set, I thought I would have no trouble being creative with it, but it is taking a little work to find my Mojo with it.  I have coloured the fern with my pastels and then sprayed it with my new gold "Smooch Spritz".  I was quite surprised how bright green my Certainly Celery card stock looked between Early Espresso and Soft Suede card stock. It almost looks like the deleted Gable Green.
As I don't have every punch, I made my little tag, using the word window punch and cutting a straight edge on one side.  Sponging always adds such a lovely finish to projects, it softens edges and blends colours together subtly.
I love colouring in, so I have water coloured and cut out my butterfly. I rolled the edges up to give it a more authentic look, so it looks about to take flight.

Stampin' Up! supplies:
Stamp set: Growing Green, All a Flutter & Pocket Silhouettes
Card stock: Soft Suede, Certainly Celery, Early Espresso, Whisper White and Watercolour Paper
Other: Stampin' Pastels, Blender Pen, gold Smooch Spritz, sponges


Thanks for stopping by

Tuesday, 14 December 2010

Simply Said

It's about time I put a blog up, so here goes.  There have been such lovely projects to look at for Christmas and I have finally finished making all my Christmas cards, now for a few hours to fill them all in.  Once they are in the post I will share.
I was reminded recently how effective making your own designer card is. For this I pulled out my first ever Stampin' Up! stamp set that my daughter and I decided to purchase.  "Simply Said" has been well used at our house, with so many different ways to use it.  Here's a colour combo that has emerged and I must say, I quite like. Stamp up a sheet of A4 card and see how many cards or ways you can use up the whole sheet of card. I have some left over so I will be putting my thinking cap on how to use the rest.
I am not usually a purple girl, but I must admit that Perfect Plum has become one of my favourite crafting colours.  Pumpkin Pie is always a hit too.
I have made this flower using the Scallop Circle punch and Boho Blossoms punch.  I have put the flowers through my crimper and then smudged them with white ink.  A brad to finish them off, and they are ready to be worn on my card, a wonderful match for the rest of the outfit.
I also took up a challenge to add something to my blog that did not entail using the Big Shot.  I hope this satisfies that challenge Keryn!!

Stampin' Up! supplies used:
Stamp sets: Simply Said, Seasons of Joy & Fun & Fast Notes
Card stock: Early Espresso, Pumpkin Pie, Perfect Plum and Sahara Sand
Ink: Always Artichoke, Pumpkin Pie, Perfect Plum and Early Espresso
Punches: Scallop Circle and Boho Blossom

If you would like to order "Simply Said" for $58.95 plus p&h, then email me to place your order today. It's such a good value stamp set with 11 stamps in the set.
 
Thanks for stopping by 

Thursday, 2 December 2010

Circle Flower on DSP

I have had this DSP flower on my desk for a while now, with the intention of using it in a card.  Today I finally worked out how to finish it.  I have cut the circle using my Circles #2 die.  I have sponged the edges with Early Espresso ink to give it the distressed look.  I have used a layout from a Cardmaking, Stamping and Papercraft magazine. It's a good challenge to emulate an idea without having the exact supplies in hand.

The scallop edge is using 1" circles made into a template, traced onto card and then cut out.  This template is then traced and hand cut onto the desired card stock.
This doesn't have a home yet, but it's a good idea to have in the stash for that last minute "got to have a card" moment in your life.

Stampin' Up! supplies used are:
Card stock:- Naturals Ivory & Always Artichoke
DSP: Neutrals & Greenhouse Gala
Ink: Early Espresso
Ribbon: Early Espresso1/8" taffeta ribbon
Brad: Metalic 
Button: Subtles

Thanks for stopping by

Summer Mini Catalogue

The new Summer Mini Catalogue is now available, brimming with lots of new products and ideas. Product in the Summer Mini is available from 1 December 2010 until 31 March 2011. 

Book a workshop today, get some friends together and discover the new products and techniques that Stampin' Up! have to offer you.  I would love to share these with you.

Thanks for stopping by

December Frenzy 1 - 29 December, 2010

Stampin' Up! are going to give us a busy month.  December Frenzy specials are available now until 29 December, so place your order today to take advantage of these specials.  Those marked in red are reduced by 50%.

Page no's are for the current Idea Book & Catalogue.


Email me today to place your order.

Thanks for stopping by

Saturday, 20 November 2010

Summery Garden

Here's the share card I came up with for our Demo Day today.  It was such fun to be together again. Creativity abounded and it was fun to share and get new ideas.  Thanks Sharlene for organising this event. 

I have been playing with the colour combo of green and orange recently, being inspired by some of our Designer Series Papers.  Our Designer Series Papers use colour combinations that I would not think to use, so when I lay the paper out and then put the cardstock out that matches, (don't you just love how SU have this so sorted) I feel new MOJO emerging.
I love the Elegant Lines folder, and have been experimenting using ink on the raised embossed image, and I love the finished effect of the raised image being inked.  To achieve this effect, lay an inkpad gently on the raised image and work until image is inked.  
When I held this card at a distance it looked like a garden with flowers in it.  I hadn't intended that when I started this design. I must say, it felt very summery and fresh!
Use some Crystal Effects to attract the bees, they are always so busy on a summers day collecting nectar. 
The butterflies finish the setting, fluttering about and making us smile.

Stampin' Up! supplies
Cardstock: Old Olive, Certainly Celery, Whisper White
Ink: Pear Pizzazz, Pumpkin Pie, Peach Parfait & Old Olive
Stampset: Flower Fancy
Embossing Folders: Elegant Lines and Beautiful Wings
Other: Crystal Effects, Dimensionals, Tombow Glue

Thanks for stopping by

Tuesday, 16 November 2010

Happy Birthday 2You

Here's a wee card I made for a special boy who just turned two.  This card made a slow development, my MOJO was flagging, but necessity urged me on to complete this project that didn't seem to go anywhere. I ended up turning my circles into balloons.  Then I thought the dogs should be carrying them. The play on words will really only benefit the adults, but then they are the ones reading cards for two year olds.
I am really loving using Pear Pizzazz as a colour, it works so well with so many colours.  So now that the dogs have safely delivered the balloons to our budding two year old, they can get on with playing together.  I hope this inspires you to use simple supplies to maximum effect.  What do you think?

SU supplies
Cardstock:  Pacific Point, Real Red,  Pear Pizzazz
Dies: Circles #2, 1/2" circle punch
Inks: Versamark, Early Espresso
Stampset: D is for Dog
Designer Series Paper: Celebrations

Thanks for stopping by

Friday, 5 November 2010

Larry Boy

I received this wonderful 'Thank You' card from my newest downline Jo.  I know her personally, but was not aware just how talented she is.  She has created "Larry Boy" using punches and I just love the colour and personality that this card has.  Thank you Jo for letting me share.

Jo has captured "Larry Boy's" character very well in his eye's.  His collar is soooo cute! He looks ready to get dirty getting up to some mischief.  I really need to beef up on the latest children's book characters.  This lack of knowledge is reminding me that I am decidedly middle aged as my children aren't at this stage anymore. I was rather ignorant of "Larry Boy's" existence until Jo gave me this card. 
Stampin' Up!  have colour coordination so perfectly sorted.  What a wonderful way to make your own DSP, using ink that matches your cardstock.  I think Larry Boy is superb! All the best embarking on your NEW Stampin' Up! career Jo, it's lovely to have you in the team. 

Stampin' Up supplies:
Cardstock: Garden Green, Real Red, Whisper White, Elegant Eggplant, Summer Sun (retired)
Ink: Summer Sun (retired), Elegant Eggplant, Real Red & Garden Green
Stampset: Family Phrases

If you would like to order your set of 'Family Phrases' for $40.95NZD + postage, email me your order today.

Thanks for stopping by

Wednesday, 3 November 2010

Craft with Anita

Join in for a 'Craft with Anita' in Hastings
Would you like to see the rest of this project, then come along this Friday evening.  You will get to make this project and another and have opportunity to share with other crafters.  To find out more, email me today.  I'd love you to join in.


Thanks for dropping by.

Thursday, 28 October 2010

Razzle Dazzle in Blue

When I got my Designer Series Paper shares and saw "Blueberry Crisp" my first thought was, 'these are my sisters colours'.   I knew she had the Razzle Dazzle stamp set, which matches the DSP design perfectly, and she  has kindly loaned her stamps to me.  Thanks sis.  Here's what I came up with. It reminds me of Europe, where our family originally came from, the lace edge etc.  The ladies in our family sew and so I can just imagine a bodice with an embroidered design like the stamped image and a lace shirt underneath with a lovely lace edge.  I must admit, a card is quicker to make.
 I have second and third generation stamped on the white cardstock.
I was feeling a European flavour flowing after enjoying a visit with my sister and sharing her stories and photo's of a recent trip to Europe.  She even visited a bag museum, now that's really something down my alley.  
Here's the inside of the card.  Not Quite Navy is a good ink colour to use 1st, 2nd and 3rd generation stamping with, it has such depth and body. 

Card's look so finished with an inside, especially when the cardstock you are using is dark.  It's hard to write in them.  Paper liners are less bulky than using cardstock on the inside.  It's a great idea to take something of your card front design to the inside of your card.  Rubber stamping is OOOOHH so perfect for this.

Stampin' Up! supplies -
Razzle Dazzle stamp set
Cardstock - Pacific Blue, Not Quite Navy & Whisper White
Ink - Not Quite Navy, Versamark, Whisper White pigment ink
Other - White embossing powder, Eyelet Border Punch, DSP Blueberry Crisp, Heat tool

Thanks for stopping by.  
Hope this adds some dazzle to your day.


Email me if you'd like to have your own Razzle Dazzle stampset for $40.95 + postage

Monday, 25 October 2010

Embossed Top Note

Here's a remake of a card I had done in Close to Cocoa and Whisper White, but as I am building on my display booklet of cards for workshops, I wanted to use the same design using the new colours.  I have replaced Close to Cocoa with Soft Suede and Whisper White with Very Vanilla.  I like this combo. The photo is showing Soft Suede to be quite dark, sorry can't take another pic as it's already on it's way to Wellington. 

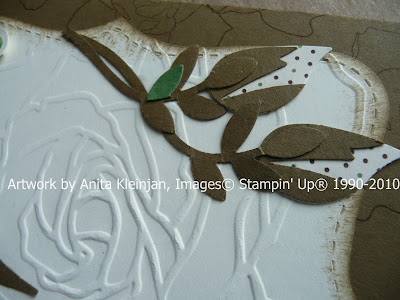
I have cut out my Top Note and then embossed it using Manhatten Flower embossing folder.  The rose in the stamp set "Growing Green" is a perfect match.
These buds are made using the Two Step Bird punch, I love how this punch has so many uses. A touch of Garden Green and a sentiment and wallah, another finished card.
Hope you are all enjoying the long weekend, we have beautiful warm sunny weather in the Bay to enjoy and catching up with some of my Wellington friends this weekend has been very special.
Thanks for stopping by.

Stampin' Up! Supplies-
Cardstock - Soft Suede, Very Vanilla & Garden Green, DSP - Woodland Walk
Stamp set - Growing Green and Sentiment from Basic Phrases
Punch - Two Step Bird Punch
Embossing Folder - Manhatten Flower

Friday, 22 October 2010

Top Note

I made this card a while ago, when I first got my big shot and top note die.  I love how the top note has so many ways it can be used. Here I have cut the cardstock on the serated line and then mounted it on a full top note cut out of DSP, it gives it that extra dimension.  These brads are also so lovely, they never fail to be eye pleasing. This flower is made using several layers of the scallop circle punch, cut through to make petals.  


The background has been stamped with our SU background stamp "Sanded",  in Soft Suede ink.
The many layers have given this card interesting focuses.  When you are spoilt for choice with dies and punches and stamps and ink, it's a challenge to use them well together without over doing it. Stampin' Up! have such wonderful products, I feel spoilt for choice.  

Supplies
Stampsets:- Very Vintage Wheel, Sanded, Flower Fancy
Cardstock:- Sahara Sand, Very Vanilla, Certainly Celery and Old Olive
Designer Brads:- Flower
Dies: Top Note, Little Leaves and Scallop Circle Punch

Thursday, 21 October 2010

Daisy in a Tango

 I surprised myself with this card, again.  I wanted to include a card in some mail going to my new downline, and had a very short time frame to work with.  I wanted my new downline to have another display card for her display book, so think, think!!  She likes bright colours.
I find to my surprise that I had taken the time to watercolour this daisy at another time, but not had time to do anything with it.  Here's my card.  I hope you like it.  It is very simple, but effective, something necessary when the time demands.  The photo doesn't really do it justice.

Supplies:
Stampset: Every Moment
Cardstock:- Tangarine Tango, Early Espresso and Watercolour Paper
Ribbon:-  Early Espresson 1/8" Taffeta Ribbon

Dress up Christmas

From 16 October to 30 November, 2010
Earn Free Ribbon by buying Christmas Bundles or hosting a $600 workshop

To download your copy of Dress up Christmas click on this link

To place your order or book to have a workshop contact me


Thursday, 14 October 2010

Bright and Cheery

I started making this card after I bought a packet of M&M's on special.  I didn't realise they were such a bright orange. Wow what a reason for inspiration.  I really wanted to do a sweet treat cup with them and ended up using retired cardstock for this one.  The colour combo was inspired by a cute wee teddy at the chemist.  I would not have thought to put orange, green and pink together, but here you have it and I really quite liked the outcome.  It is not my usual style, so what do you think?  I know when my good friend Lynda received it in the post for her Birthday card, she liked it, she even ate some of the lollies.  It suits her cheery and bright personality.  I had to make her a bright coloured card.


My wee embosslits 'Beautiful Wings' are getting well used.  I just love how easy they are to use, they emboss and cut out all in the one action.  They are certainly worthy of a little attention.

 I used a white gel pen to add the detail on the flowers.  This made them pop a little. 

Supplies:-
Stamp Set - Flower Fancy
Cardstock - Naturals Ivory, Only Orange (retired), Green Galore (Retired), & Pixie Pink (Retired)
Embosslits Dies - Beautiful Wings $26.50 & Sizzlits dies - Little Leaves
Detail on flowers made with White uni-ball Signo Gel Pen

Email me if you would like to order the Embosslits die for $26.50 + postage.